ISG Vertical Pipeline Centrifugal Pump mechanical seal replacement steps
Performing a mechanical seal replacement on a vertical pipeline centrifugal pump requires careful attention to detail and strict adherence to field safety and assembly rules. A poorly executed replacement often leads to repeated leakage, shortened seal life, and unexpected mid-operation shutdowns. Every step should be carried out with clean tools and controlled force, so the new seal can deliver the expected reliable performance under normal system operating conditions.
Pre-work safety and pump disassembly preparation
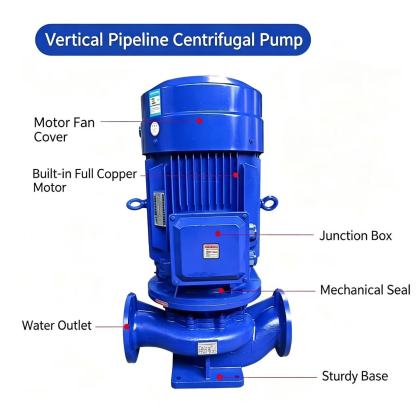
Before starting any work on the seal, fully isolate the motor power using proper lockout and tagout procedures to eliminate any risk of accidental startup. Close both suction and discharge valves completely, open the system vent, and drain all remaining fluid from the pump casing and connected piping to clear the work area of residual pressure and spilled media. Disconnect any auxiliary wiring or sensor lines that could obstruct access, then remove the coupling guard and loosen the fasteners that connect the motor to the pump bracket. Lift the motor slowly and set it down on a clean, flat nearby surface, making sure the motor shaft does not receive any unintended impact or scratch during the process. This preparation stage creates a safe, unobstructed workspace and prevents avoidable damage to other critical components before the seal is even touched.
Old seal removal and mating surface cleaning
Secure the pump shaft to prevent unwanted rotation, then remove the impeller fastener and slide the impeller carefully off the shaft. Loosen all set screws and locking components on the old seal assembly, then gently slide both the rotating and stationary seal elements off their respective positions. Never use sharp pry bars or heavy striking tools directly against the shaft or seal chamber bore, as these can create permanent scratches that cause new leakage paths even after a new seal is installed. Wipe the entire exposed shaft surface, seal chamber bore, and seal seat mounting face with lint-free cloth and approved cleaning fluid, removing all scale, old gasket residue, rust spots, and accumulated debris. After cleaning, inspect the shaft for any deep grooves, corrosion marks, or runout that exceeds acceptable limits, since even a small imperfection on the shaft surface can drastically reduce the service life of the new seal.
New seal installation and final functional verification
Handle the new seal assembly only by its outer metal or elastomeric components, and never touch the precision lapped seal faces with bare fingers. Apply a very thin, uniform layer of compatible lubricant to the shaft surface and the seal’s elastomeric elements, so the seal can slide smoothly into position without binding or twisting. Insert the stationary seal ring evenly into the seal seat, making sure it sits completely flat with no tilting, then slide the rotating seal assembly onto the shaft until it reaches the exact pre-calculated working position. Reinstall the impeller, fasten the impeller nut to the correct torque value, and reassemble all remaining pump components in reverse order of the disassembly sequence. After the full assembly is complete, rotate the pump shaft manually several full turns to confirm the seal moves freely with no tight spots, scraping sounds, or uneven resistance. Refill the pump casing with clean fluid and perform a static pressure test for an adequate period, checking around the seal area for any sign of continuous leakage before reconnecting the motor power and returning the unit to normal operation.
Recommend
-

-

QQ Zone
-

Sina Weibo
-

Renren.com
-

Douban