ISG Vertical Pipeline Centrifugal Pump overhaul operation procedure
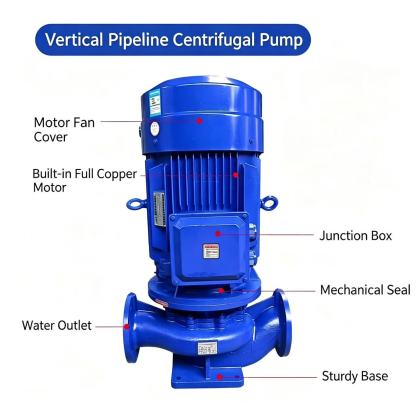
Overhaul of an ISG vertical pipeline centrifugal pump requires systematic disassembly, inspection, reconditioning, and reassembly based on field experience and established mechanical maintenance standards. Every step should follow safety lockout and tagout procedures before any physical contact with the unit begins. Technicians must confirm that all power supplies are disconnected, piping valves are fully closed, and residual pressure inside the casing has been completely vented. Without these preliminary controls, unexpected rotation or trapped fluid can lead to equipment damage or personal injury.
Pre-Disassembly Preparation and Component Marking
Before loosening any bolt, clean the exterior surface of the pump and motor assembly to prevent dirt from entering sealing faces or bearing chambers during teardown. Use non-permanent marking tools to align flanges, bracket interfaces, and coupling halves so all relative positions can be restored accurately during reassembly. Record the original shaft position, coupling gap, and mounting alignment reference points in a field log. This practice eliminates guesswork later and avoids introducing unintended mechanical stress after overhaul.
Controlled Disassembly Sequence and Part Protection
Start disassembly by removing the coupling guard and verifying the original alignment condition before separating the pump from the motor. Loosen casing bolts in a diagonal pattern to prevent uneven stress that might warp the flange. Lift off the pump body carefully, then extract the impeller, seal chamber, and rotating assembly in sequential order. Place every removed component on a clean, flat surface with soft supporting material to protect machined surfaces. Never allow sealing faces, threads, or bearing journals to come into direct contact with hard floors or sharp tools.
Dimensional Inspection and Wear Assessment
Measure critical clearances such as impeller seal ring gap, shaft runout, and bearing internal play with calibrated instruments. Compare all readings with original technical reference values to determine whether reconditioning or replacement is necessary. Check the impeller for cavitation pitting, erosion, or cracks, and inspect the shaft for signs of bending or fretting corrosion at key mounting positions. Document every measurement clearly so the reassembly process can be adjusted to restore original hydraulic and mechanical performance.
Mechanical Seal and Bearing Reconditioning
Handle the mechanical seal assembly with extreme care, especially the two precision lapped faces. Wipe all mating surfaces with a lint-free cloth and use compatible cleaning fluid that leaves no residue. Do not apply excessive force when pressing the seal onto the shaft, and ensure the correct installation depth is maintained to avoid premature face wear. For bearings, clean all old lubricant completely, inspect rolling elements and races for pitting or noise, then recharge with the appropriate grade and quantity of lubricant before fitting. Even minor errors during this stage can lead to overheating or leakage shortly after restart.
Precision Reassembly and Field Verification
Reinstall components in the reverse order of disassembly, following the earlier position marks to keep original geometric relationships intact. Tighten all bolts evenly in stages to maintain uniform contact across flanges and mounting surfaces. After reassembly, manually rotate the shaft several full turns to confirm smooth movement without binding, rubbing, or unexpected drag. Perform a final visual check of all connections, sealing positions, and fastener security before removing tools and clearing the work area. This step ensures the overhauled unit is ready for safe, reliable commissioning under operating conditions.
Recommend
-

-

QQ Zone
-

Sina Weibo
-

Renren.com
-

Douban